Once your certificate passed the activation, validation and was issued by the Certificate Authority, you can proceed with the installation steps.
| Note: If you use virtual machine instance, you can find the SSL setup guidelines here, please also check the following documentation for more details. |
SSL certificate installation for your Google Cloud application can be performed in a few steps:
- Download the archive with the certificate files from your SSLs.com account or from the email sent to you from the Certificate Authority. (The ZIP archive will contain yourdomain.crt, yourdomain.p7b and yourdomain.ca-bundle files. Only yourdomain.crt and yourdomain.ca-bundle files have to be used during the installation)
- Sign into your Google Cloud account
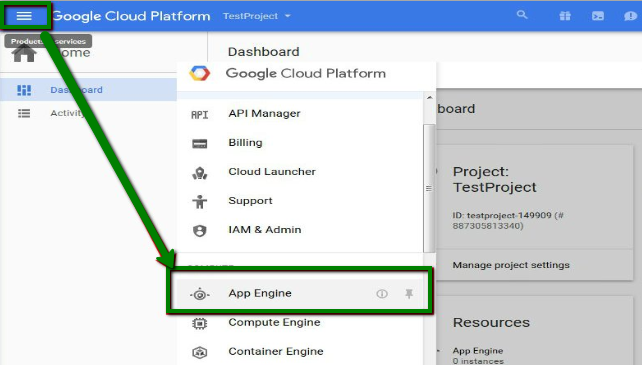
- Navigate to Products & services >> App Engine:
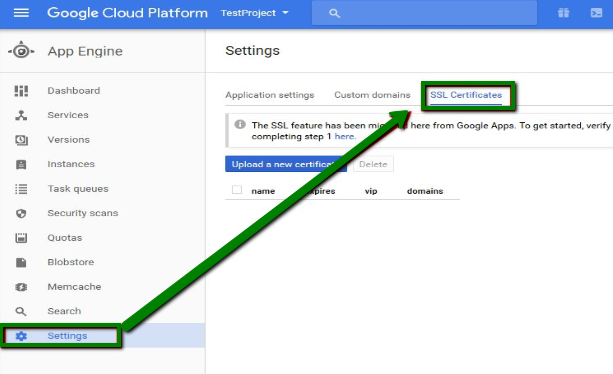
- Open Settings in the App Engine menu and click on the SSL certificates tab on the next page:
- Upload a new certificate is the option that we are looking for. It will open the Add a new SSL certificate menu upon a click.
- The next window has two boxes where the Certificate and the Private Key codes should be pasted into:
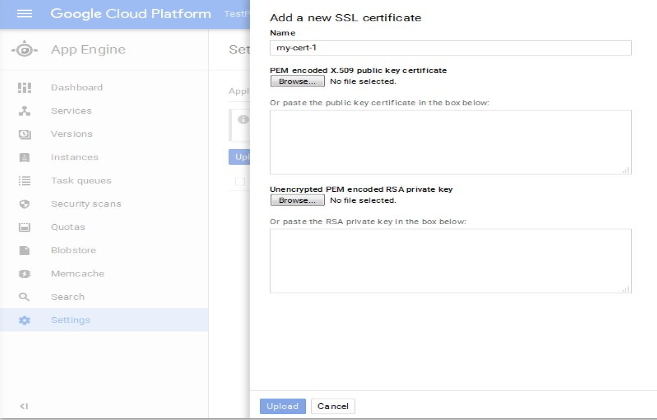
The Private Key code was generated along with the CSR (Certificate Signing Request) for your domain name. If you generated the CSR using our CSR generation guide, the file containing the Private Key code will be located in the same directory as the CSR file. This code including —–BEGIN RSA PRIVATE KEY—– and —–END RSA PRIVATE KEY—– tags should be pasted into the Unencrypted PEM encoded RSA private key box.
Important! An SSL certificate along with the corresponding CA-bundle should be used for the PEM encoded X.509 public key certificate box. CA-bundle for your certificate is yourdomain.ca-bundle file from the downloaded archive. The tricky point is that the certificate field should contain a combined SSL certificate and CA-bundle codes. You can simply paste the contents of both yourdomain.crt and yourdomain.ca-bundle files into this field. CA-bundle codes (yourdomain.ca-bundle content) should be pasted right below the certificate code with no extra spaces.
Also, you can proceed with the file uploading instead of copying and pasting the codes. To do that, it is necessary to use the Browse” option where you provide a Private Key file and a combined certificate file.
Once the certificate and the Private Key are provided, click Upload to finalize the process.
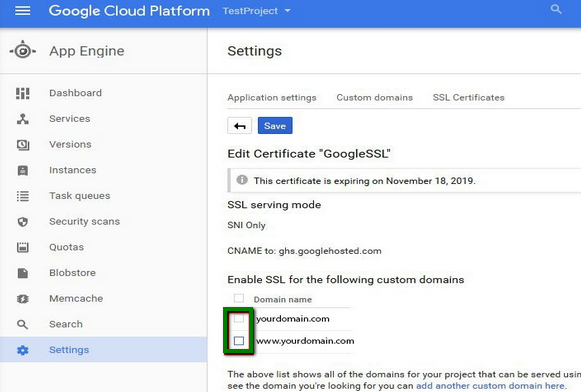
The last step is to mark the domains you wish to secure under Enable SSL for the following custom domains on the Edit Certificate screen:
Now the installation is completed and you can verify it using this online tool.