After your certificate is activated and issued, you can proceed with its installation on GlassFish.
Since GlassFish uses keystores (.jks files), the certificate files need to be imported into the keystore with the corresponding private key before installation. For this, you will need to locate the keystore that was used to generate the CSR. This keystore is the only one that contains the private key for your certificate. If you cannot retrieve the keystore, the certificate will need to be reissued with a new keystore.
Certificate files can be downloaded from your SSLs.com account or retrieved from the email sent by Comodo (now Sectigo). The .zip archive downloaded from your account will contain your certificate and CA bundle in PEM format (.crt and .ca-bundle files), and in the PKCS#7 format (.p7b). We recommend importing the certificate files in PKCS#7 format (.p7b / .cer) since this process is simpler; however, they can be imported in PEM as well.
Importing the certificate
The certificate files should be uploaded to your server so they can be imported into the keystore. It is sufficient to import the certificate in only one of the following formats.
– PKCS#7 (.p7b, .cer)
Importing the certificate in PKCS#7 is done with a single command:
keytool -import -trustcacerts -alias myalias -file file.p7b -keystore mykeystore.jks
You will be prompted to enter the keystore password that was set when creating the keystore. The myalias value should be the same alias that was initially set for the keystore. You can review the alias with this command: keytool -list -v -keystore mykeystore.jks
Below is a screenshot of an example import:

– PEM (.crt, .ca-bundle)
Importing the certificate files in PEM requires first importing the CA certificates (.ca-bundle file), and then importing the certificate itself. If you do not have the .ca-bundle file, you can download it from your SSLs.com account.
The CA bundle can be imported with this command:
keytool -import -trustcacerts -alias ca -file file.ca-bundle -keystore mykeystore.jks
The alias used to import the CA bundle can be any name, but it has to be different from the alias of the keystore.
When the CA bundle is imported, you can import the certificate with the following command:
keytool -import -trustcacerts -alias myalias -file file.crt -keystore mykeystore.jks
Here the alias has to be the same as the keystore alias. The screenshot below illustrates the import process for certificate files in PEM:

Installation
When the keystore is ready, it should be imported into the default GlassFist keystore, which can be found in the following location: glassfish4/glassfish/domains/domain1/config/keystore.jks
domain1 is the default domain created by GlassFish. If you have added a new domain to GlassFish, the corresponding directory name should be used instead.
The following command is used to import one keystore into another:
keytool -importkeystore -srckeystore mykeystore.jks -destkeystore keystore.jks
You will be prompted to type in the password for both keystores, starting from the destination keystore keystore.jks. The password for GlassFish keystores is the same as the GlassFish master password for the domain; by default, it is changeit. Depending on the certificate format you used for import, there will be a different number of imported entries. If you used different passwords for the keystore and the private key, the private key password will need to be entered too.
Note: For the certificate to work on GlassFish, the GlassFish master password for the domain, the keystore password, and the private key password must all be the same. If one of the passwords does not match the others, please see the Troubleshooting section at the end to change it.
You will receive a confirmation saying the import was successful, as shown below:

Once your keystore is imported, GlassFish configuration needs to be updated to start using the new certificate. This can be done using the GlassFish administration console, or by manually updating configuration in the domain.xml file.
Web Interface (GlassFish Administration Console)
To access the GlassFish Administration Console remotely, the secure administration feature needs to be enabled for the domain first. This can be done by using the following command: asadmin enable-secure-admin example.com
Once enabled, you can access the administration console via https://example.com:4848. You will need to bypass the certificate warning given by the self-signed certificate that is installed on GlassFish by default.
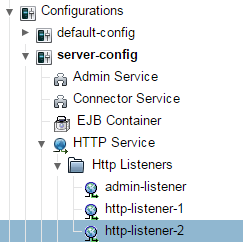
To enable the certificate via the GlassFish Administration Console, enter this menu: Configurations >> server-config >> HTTP Service >> HTTP Listeners >> http-listener-2:
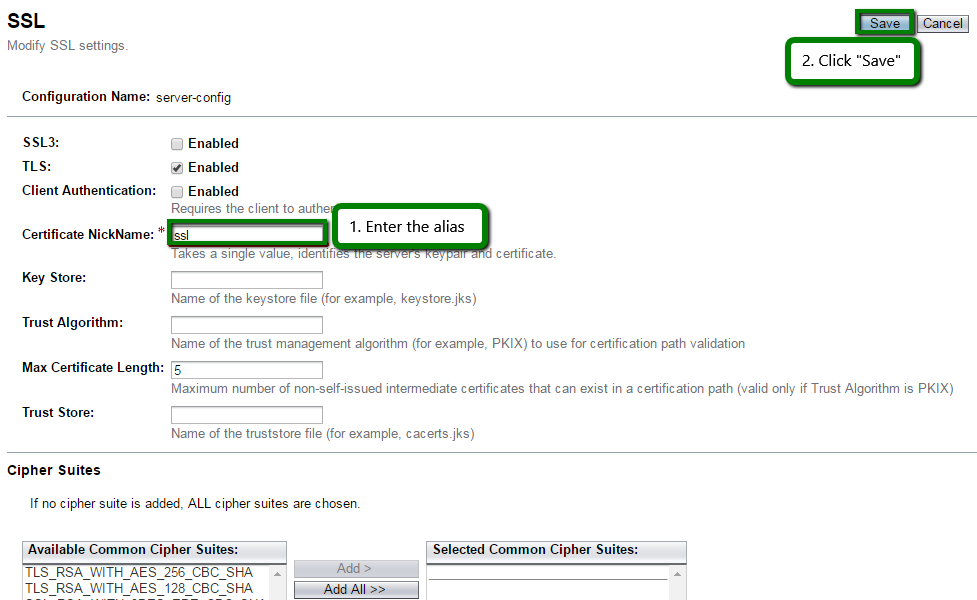
Switch to the SSL tab, enter your certificate alias myalias as the Certificate NickName, and click Save:
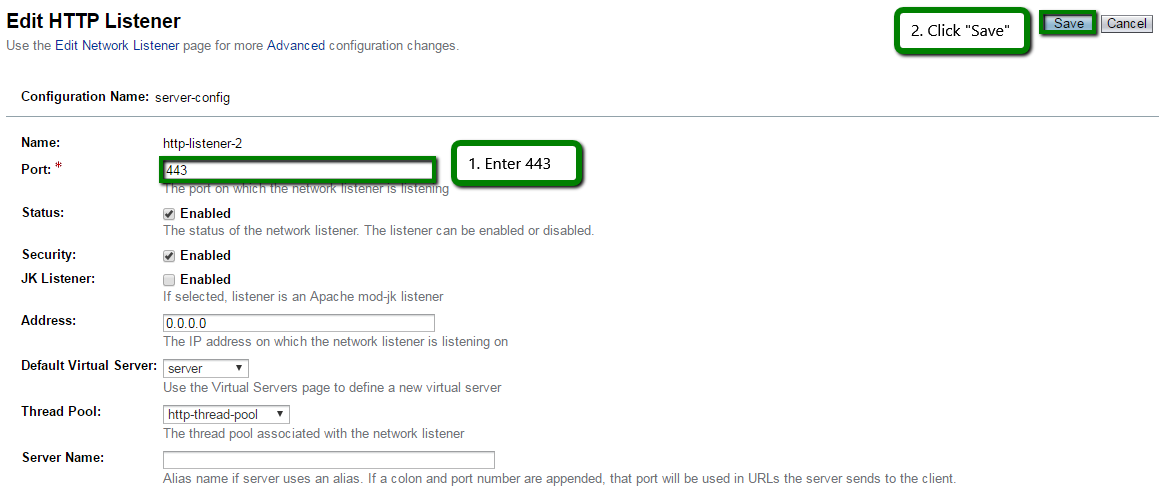
The default GlassFish port for HTTPS is 8181; you may want to change it to the usual 443 in the General tab:
The certificate can be installed for the GlassFish Administration Console in the same way by going to HTTP Listeners >> admin-listener.
It is possible not all configuration references will be updated to the new alias. In this case, it will be necessary to update them manually in domain.xml.
Editing domain.xml
Instead of using the web interface (GlassFish Administration Console), you can manually edit the domain.xml configuration file with the appropriate certificate alias and port. The file is located in glassfish4/glassfish/domains/domain1/config/domain.xml.
Before opening the file, we recommend stopping the GlassFish service for this domain with the following command:
asadmin stop-domain example.com
Open the file with your preferred text editor and locate any reference to s1as, which is the default certificate alias used by GlassFish. s1as should be replaced with myalias,our certificate alias.
If the file contains references to port 8181, you can also update them to 443:

If all aliases are updated to your alias, the certificate will also be installed for the GlassFish Administration Console.
Save the changes in domain.xml and start the domain:
asadmin start-domain example.com
This completes the installation, and the domain can now be accessed via HTTPS.
You can use this tool to check certificate installation: https://decoder.link/sslchecker.
Optional configuration
Using your own keystore
Instead of importing your keystore into the default GlassFish keystore keystore.jks, you can edit domain.xml to reference your own keystore instead. Similar to the above editing, all references to keystore.jks need to be replaced with your mykeystore.jks keystore filename. In this case, your personal keystore should be placed into the same directory with the default keystore:
Redirect to HTTPS
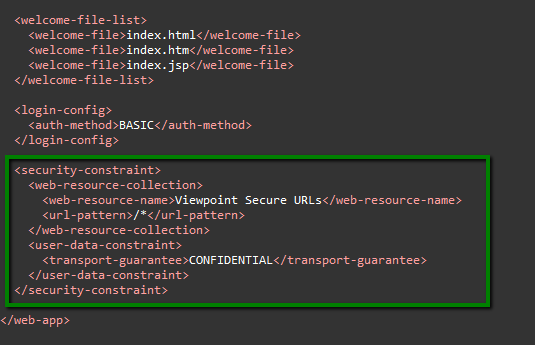
To redirect all HTTP traffic to HTTPS, open default-web.xml (or your web.xml file if you have one) located in the domain config directory glassfish4/glassfish/domains/domain1/config and add the following within <web-app> … </web-app>:
<security-constraint>
<web-resource-collection>
<web-resource-name>Viewpoint Secure URLs</web-resource-name>
<url-pattern>/*</url-pattern>
</web-resource-collection>
<user-data-constraint>
<transport-guarantee>CONFIDENTIAL</transport-guarantee>
</user-data-constraint>
</security-constraint>
An example of what it might look like:
Save the changes and restart the domain – this will complete the setup.
Troubleshooting
This section covers several more or less common errors that can be encountered during installation, checking errors, and guidelines for password changes.
Errors
keytool error: java.io.IOException: Keystore was tampered with, or password was incorrect
This keytool error will be displayed during any action with the keystore if the entered keystore password or private key password is incorrect.
If you do not remember the password, unfortunately, there is no way to recover it, and you will need to create a new keystore.
keytool error: java.lang.Exception: Failed to establish chain from reply
The above error occurs when the keystore does not have the intermediate certificates (otherwise known as the CA bundle) needed to establish the full chain. Make sure you have imported the CA bundle certificates first, or better, try importing the certificate in PKCS#7.
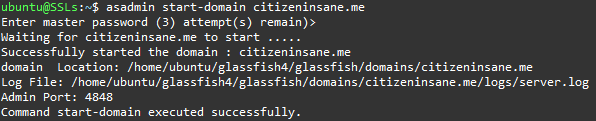
There is a process already using the admin port 4848 — it probably is another instance of a GlassFish server.Command start-domain failed.
If you cannot start the domain with this error being displayed, you will need to kill the java process manually. First, run this command to locate the process:
sudo netstat -ntulp
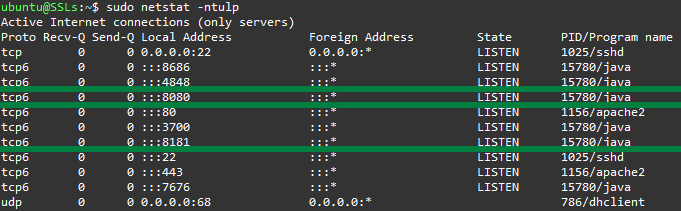
Copy the PID of java running on your GlassFish ports (15780 in the above screenshot), and run this command to kill the process:
kill 15780
You will now be able to start the domain using the usual asadmin commands.
Checking errors / Debug
If you encounter any issues with the HTTPS connection, it is worth checking the server log for errors, which is located in glassfish4/glassfish/domains/domain1/logs/server.log.
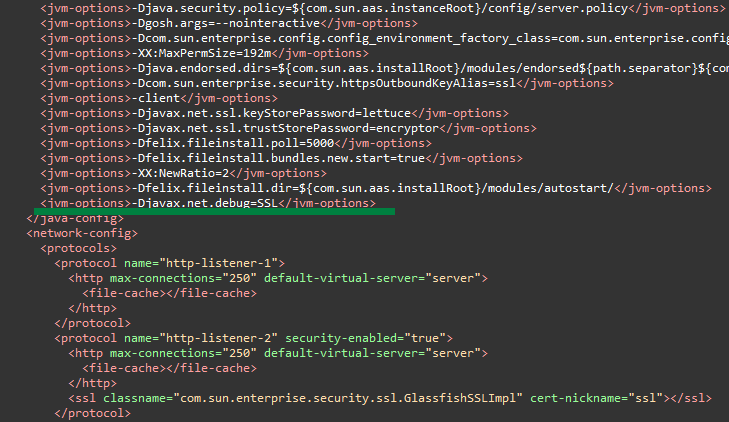
This will contain sufficient information on the SSL errors; however, if you feel it is not enough, you can set the debug level to SSL in domain.xml by adding the following JVM option within the <java-config> section: <jvm-options>-Djavax.net.debug=SSL</jvm-options>
Checking the keystore
You can check the content of a keystore with this command:
keytool -list -keystore mykeystore.jks
This will give you a short list of all entries in the keystore. To get more information on each entry (e. g., how many certificates it contains, or if there is a private key), you can add the -v flag:
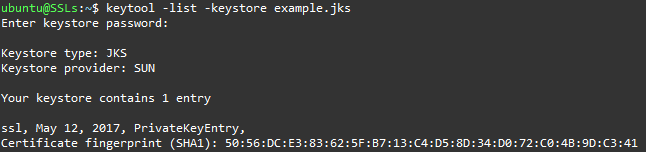
keytool -list -v -keystore mykeystore.jks
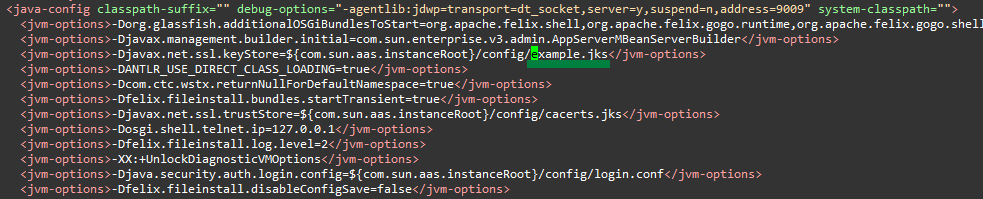
In the below example, the keystore example.jks contains only one entry with a private key:
Changing passwords
For the certificate to work, the GlassFish master password for the domain, the keystore password, and the private key password must all be the same. If they are not, you will receive various errors upon HTTPS connection and in the server log. To make sure all three passwords are the same, you can use the commands below to change them.
– GlassFish domain master password
The GlassFish master password is “changeit” by default and can be changed with the change-master-password subcommand of asadmin:
asadmin change-master-password domain1

– Keystore password
The password to a keystore can be changed with the following keytool command:
keytool -storepasswd -keystore mykeystore.jks

– Private key password
The password to the private key within the keystore can be changed with this command:
keytool -keypasswd -alias myalias -keystore mykeystore.jks

Sources
For further reading, you can refer to the documentation listed below:
Keytool: https://docs.oracle.com/javase/6/docs/technotes/tools/windows/keytool.html
GlassFish documentation: https://javaee.github.io/glassfish/documentation
GlassFish Administration Guide: https://javaee.github.io/glassfish/doc/4.0/administration-guide.pdf
GlassFish Security Guide: https://javaee.github.io/glassfish/doc/4.0/security-guide.pdf