When your certificate is activated and issued, you can proceed with installation on Zimbra.
There are two ways to install a certificate on a Zimbra mail server: in the Zimbra Administration Console WebApp, or using the Zimbra command line interface.
The preferred installation method depends on where the CSR for your certificate was generated. If the CSR was not generated on Zimbra, the certificate should be installed via the Zimbra Certificate CLI.
Certificate installation in the Zimbra Admin Console
By default you can access the Zimbra Administration web interface with the following URL:
https://yourdomain.com:7071
– yourdomain.com is the Zimbra server hostname, usually assigned during the initial Zimbra setup.
Log into the Administration Console with your admin credentials (the default admin username is admin@yourdomain.com) and follow these steps:
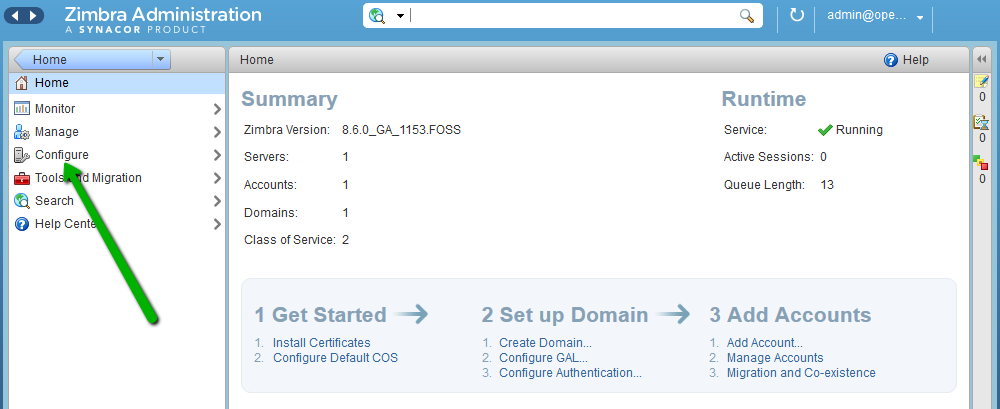
1. Click Configure in the menu list on the left:
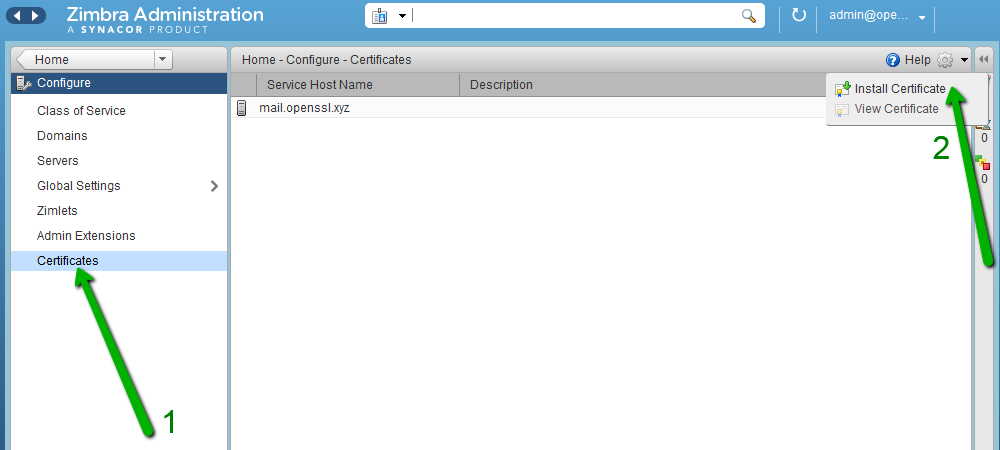
2. Click Certificates in the left pane, then click the gear icon on the top right and select Install Certificate.
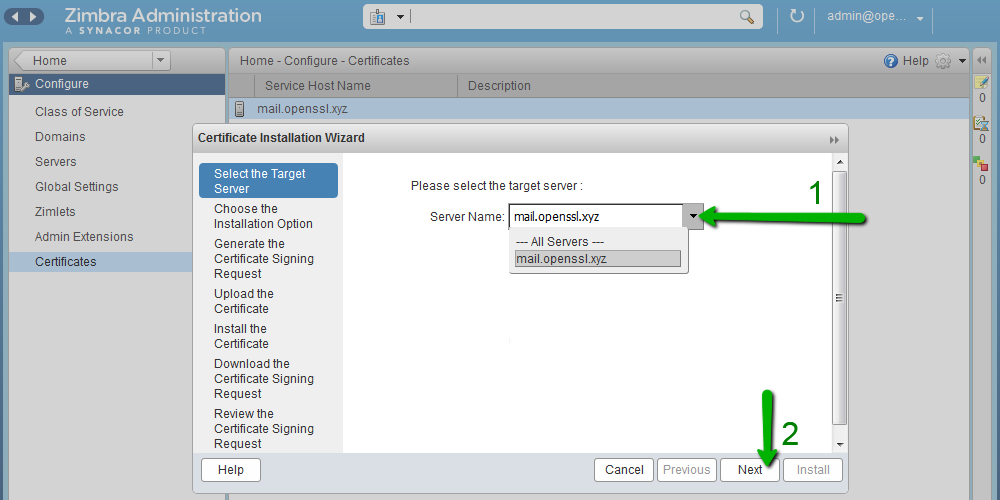
3. Select the needed servername from the drop-down menu and click Next:
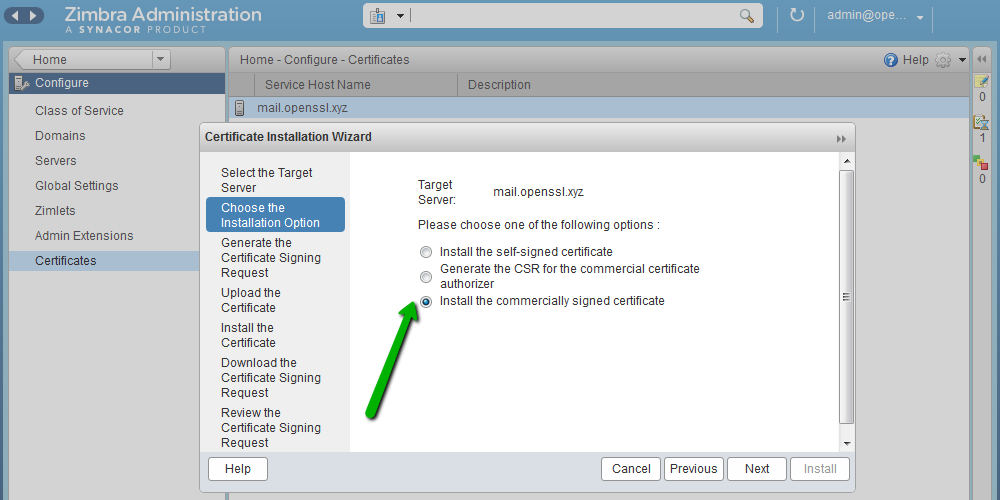
4. Select Install the commercially signed certificate and click Next:
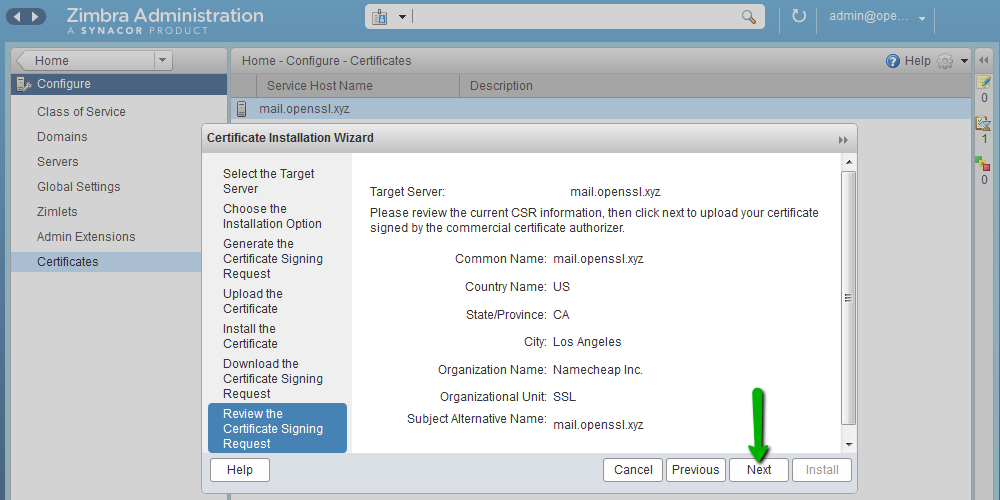
5. Review the details that were submitted for CSR generation and click Next to proceed:
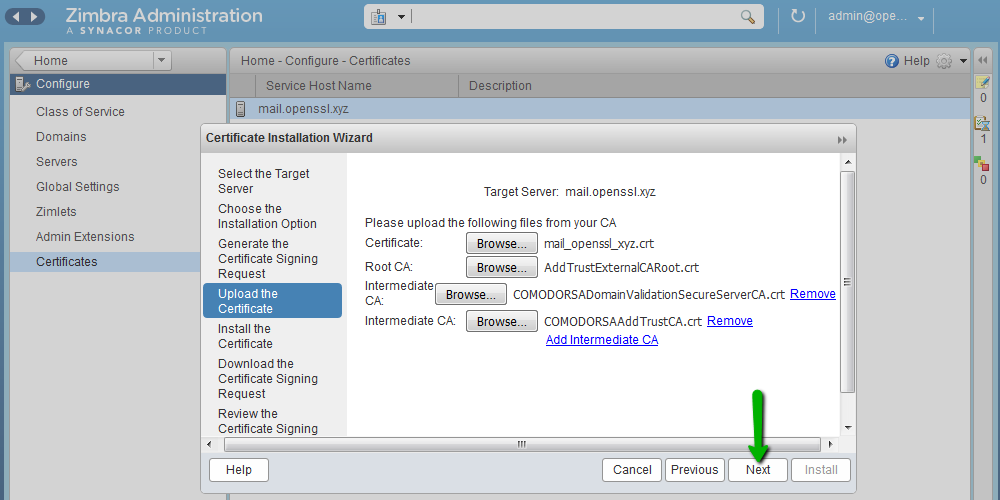
6. Upload your certificate file and CA bundle certificates. Your certificate (the .crt file) and CA bundle can be downloaded from your SSLs.com account.
Note that the download will contain CA bundle certificates in a single .ca-bundle file. You can manually save the CA certificates into separate files using any text editor (e.g., Notepad or TextEdit); the top-most two certificates are intermediate CA certificates, and the last certificate is the root CA. Sectigo (former Comodo) CA Bundlecertificates in separate files can be downloaded here:
For example, CA certificates for Domain Validation certificates should be uploaded the following way:
RSA
Root CA: USERTrust RSA Certification Authority [ Cross Signed ]
Intermediate CA: Sectigo RSA Domain Validation Secure Server CA [ Intermediate ]
ECC
Root CA: USERTrust ECC Certification Authority [ Cross Signed ]
Intermediate CA: Sectigo ECC Domain Validation Secure Server CA [ Intermediate ]
When the files are uploaded, click Next to confirm and continue:
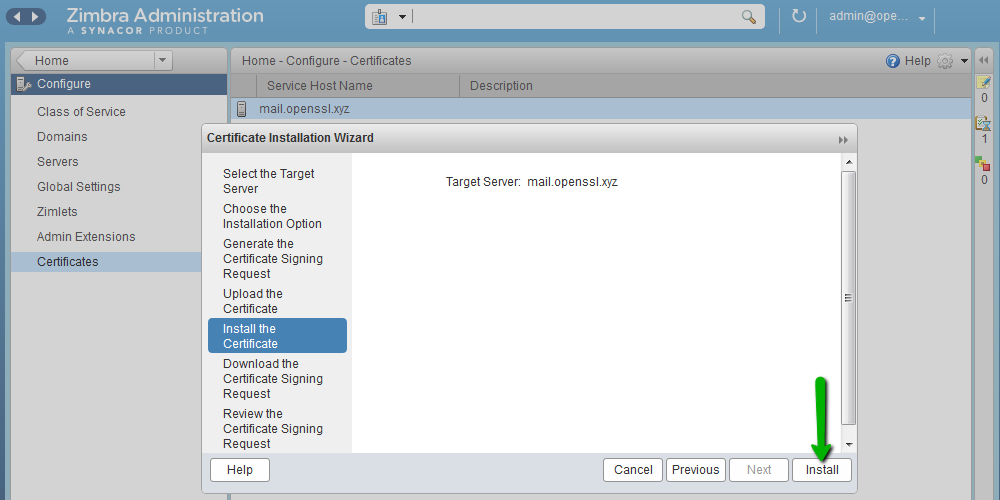
7. Click Install to install the certificate. The process may take a few minutes.
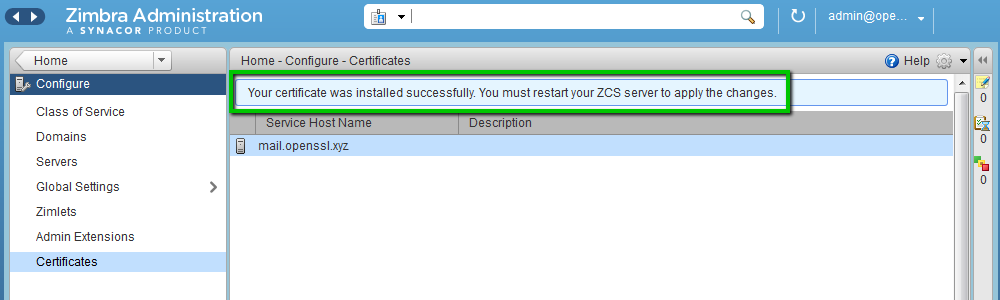
8. Once certificate installation is completed, the following message will be displayed, confirming the installation was successful:
9. Log in as the zimbra user with this command (you need to be logged in as root to run this command — you can run sudo su to switch to root):
su – zimbra
Restart the services to apply the changes with this command:
zmcontrol restart
10. After the restart, you can check the installed certificate by going to Configuration >> Certificates >> click on the gear icon and select View Certificate:
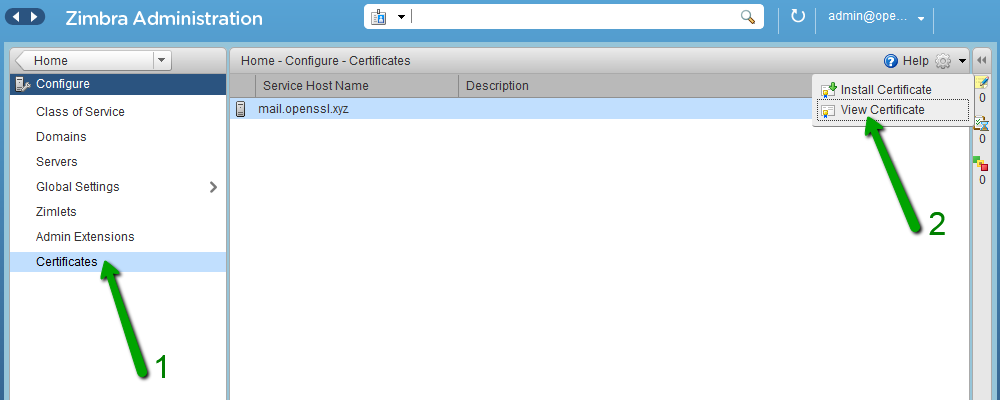
11. The window will display the certificate and services it was installed for:
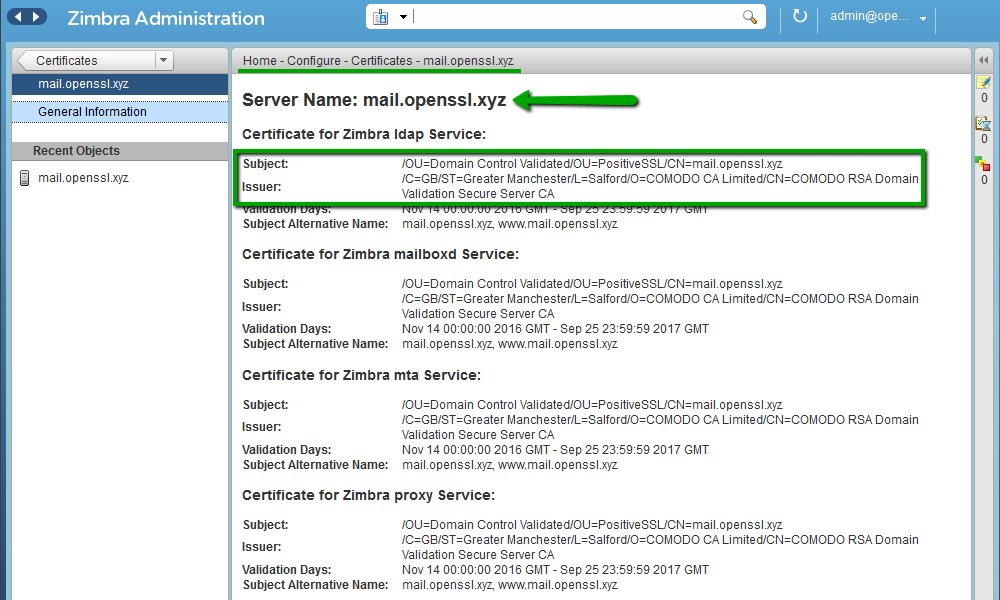
The certificate has been installed for the following services:
LDAP service: port 389
Mailbox service: ports 8443, 7071
MTA service: ports 25 (SMTP TLS), 465 (SMTP SSL), 7110 (POP3 TLS), 7143 (IMAP TLS), 7993 (IMAP SSL), 7995 (POP3 SSL)
Proxy service: 443, 110 (POP3 TLS), 143 (IMAP TLS), 993 (IMAP SSL), 995 (POP3 SSL).
Certificate installation can be checked using this online tool.
Certificate installation using Zimbra Certificate CLI
You can use the zmcertmgr command line utility to manage and install certificates. SSH access to the server will be needed for it. To use this tool, log in as root for Zimbra version prior to 8.7, or as the zimbra user for versions 8.7 and higher. Switch to root by running this command:
sudo su
To switch to the zimbra user (for Zimbra 8.7 and higher), you can run this command (you need to be logged in as root):
su – zimbra
The default location of the zmcertmgr tool is /opt/zimbra/bin/zmcertmgr.
To install the certificate, follow these steps:
1. Upload the certificate (.crt) and CA bundle (.ca-bundle) files to any directory on the server. Your certificate and CA bundle can be downloaded from your SSLs.com account. If you did not generate the CSR for your certificate on Zimbra, also upload the private key that was generated with your CSR.
For this example, the certificate and CA bundle were uploaded into the /opt/ directory.
In all further commands, replace /opt/yourdomain_com.crt and /opt/yourdomain_com.ca-bundle with the appropriate file locations and names.
Note: the CA bundle has to contain the intermediate CA certificates, as well as the root CA certificate. We recommend using the .ca-bundle file downloaded from your account for this purpose, as it will contain all needed certificates.
2. Verify that your certificate and private key match by using this command:
/opt/zimbra/bin/zmcertmgr verifycrt comm /opt/zimbra/ssl/zimbra/commercial/commercial.key /opt/yourdomain_com.crt /opt/yourdomain_com.ca-bundle

3. Deploy the certificate by running this command:
/opt/zimbra/bin/zmcertmgr deploycrt comm /opt/yourdomain_com.crt /opt/yourdomain_com.ca-bundle
For successful execution, the output should look like this:

Note: if you did not generate the CSR on Zimbra, first place the private key for your certificate into the following directory: /opt/zimbra/ssl/zimbra/commercial/
The private key file needs to be named commercial.key. If needed, replace the existing file.
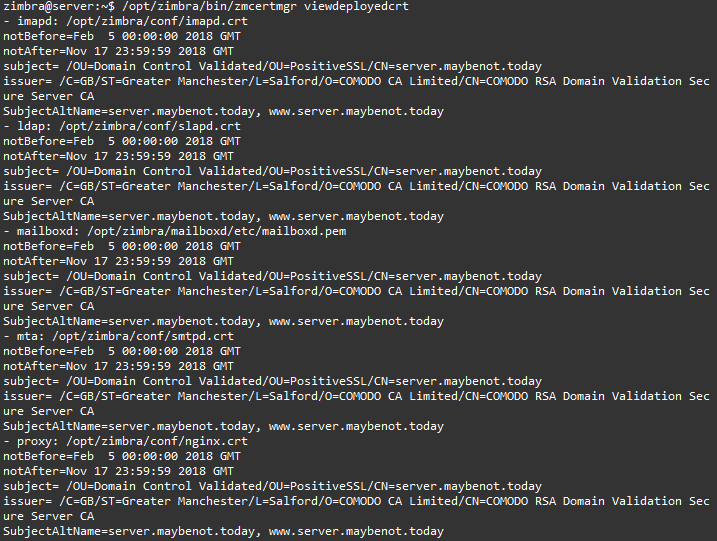
4. You can verify the certificate details by running this command:
/opt/zimbra/bin/zmcertmgr viewdeployedcrt
Here is an example output:
5. Restart the Zimbra services with the following command (you need to be logged in as the zimbra user; you can switch to the Zimbra user with su – zimbra):
zmcontrol restart
This will complete the installation process.
When the services are restarted, you can check certificate installation with this tool.
More details on zmcertmgr tool usage can be found on the Zimbra Wiki.
Guidelines on additional SSL options configuration can be found here.