Before the Certificate Authority (CA) can issue SSL to anyone they need to verify that the organization or individual has the right to receive the SSL certificate to avoid cases when the SSL is issued to intruders who impersonate real websites for their cyber attacks. The person requesting the SSL should have admin access to the domain. The organization should legally and physically exist for business validated certificates.
To confirm you have admin access to the domain submitted in the SSL activation request, you have three options:
- Email Validation — receive an email at a domain-based email.
- HTTP Validation — upload the validation file at your host.
- DNS Validation — set up a CNAME record in the domain’s DNS zone.
- DNS TXT Random value – set up a TXT record in the domain’s DNS zone.
Email Validation
Note: The email-based validation with WHOIS email is not available due to the upstream provider updates.
Certificate Authority will send you an email to a domain-based email address. You will need to copy the validation code, open the link inside that email, and paste the validation there to complete the DCV process. As soon as you do that, the Certificate Authority will issue SSL for you if it doesn’t require business validation.
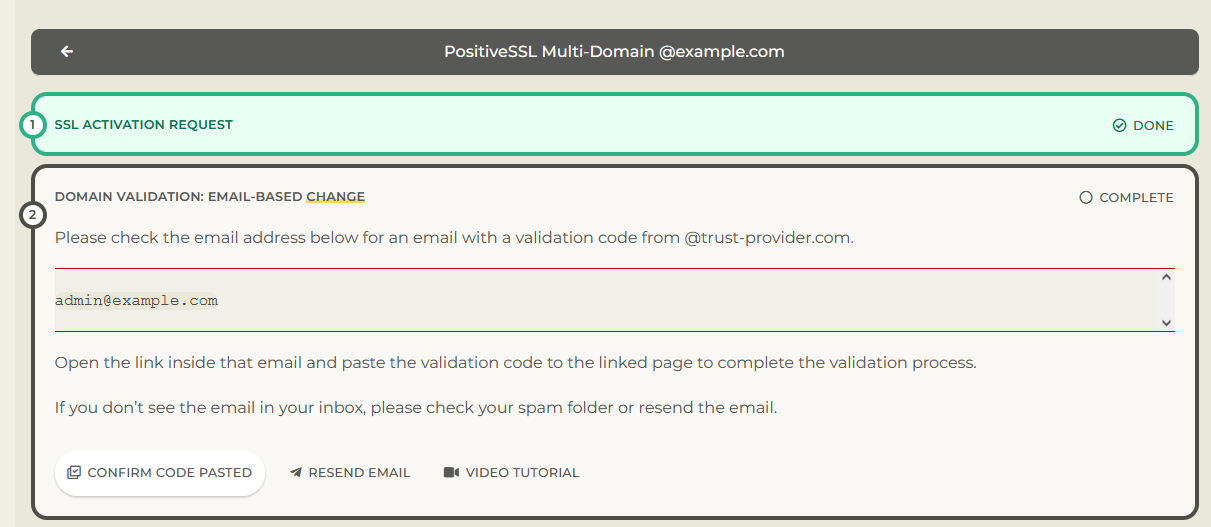
Choose approval email
During the activation process, select “Receive an email” as the domain control validation method. It can’t be any email, but one of the following generic domain-based emails:
- admin@
- administrator@
- postmaster@
- webmaster@
- hostmaster@
How to use the approval email?
The approval email will be sent in a few minutes after the SSL activation is submitted with the certain email address selected for the DCV purpose.
There will be a verification code in the email body and the link where to paste it:
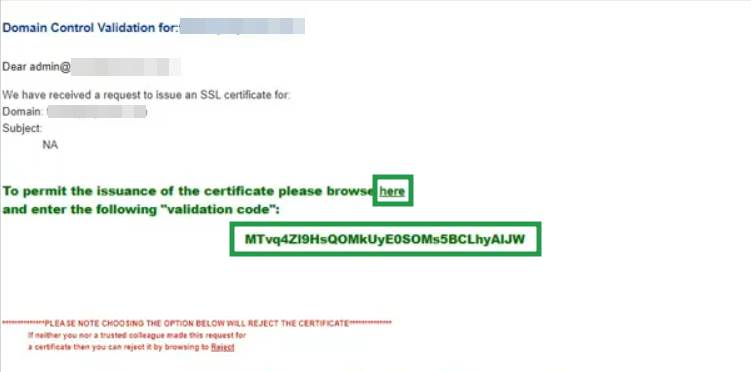
Once the verification code is entered, the DCV process is done. It may take some more time for the SSL status to be updated accordingly in your SSLs.com account. Use the ‘Confirm Code Pasted’ button to speed it up.
What if I did not receive the validation email?
- Check your Spam and Junk folders.
- Make sure that your email address is accessible. For example, you can send a test email to the selected address from your personal email.
- Resend the approval email.
What if I selected an email that doesn’t exist?
Domain-based emails may not exist by default. If you don’t know how to access the email, most probably it does not exist and you should create it. Please contact your webmaster or hosting provider for assistance with that.
If you activated your SSL and realized that the selected approval email does not exist, you have 2 options:
- Create the selected email address and then resend the approval email.
- Change the validation method using Status Checker.
HTTP
This type of DCV validation needs you to upload the validation file to your domain’s directory. Select “Upload a file” on the last step of SSL activation to enable this option.
Note: This method is not available for Wildcard SSLs.
Once the Certificate Authority locates the file they will know you have access to the domain submitted in the SSL request. In case of a DV certificate, the CA will issue SSL for you right away after the DCV is passed.
The Certificate Authority checks for the file once per a certain amount of time. They will check the file in 5 minutes after the request was submitted, then in 15 minutes after that, then in 45 minutes, and so on until the file is checked just once in 30 hours. So the file is checked for 2 times within the first 20 minutes after the activation.
How do I get the validation file?
To find the validation file, follow these steps:
1. Activate your SSL selecting “Upload a file” as the DCV method.
2. Once you complete all steps of the activation flow you will end up on the SSL details page that contains instructions and the option to download the validation text file.
Alternatively, you can go directly to “My SSL” dashboard, click the “Details” button next to the SSL in “Pending” status with the domain that needs a DCV check.

On the next page, use the “Download .TXT” button within the “Domain Validation” tab to download the necessary file.
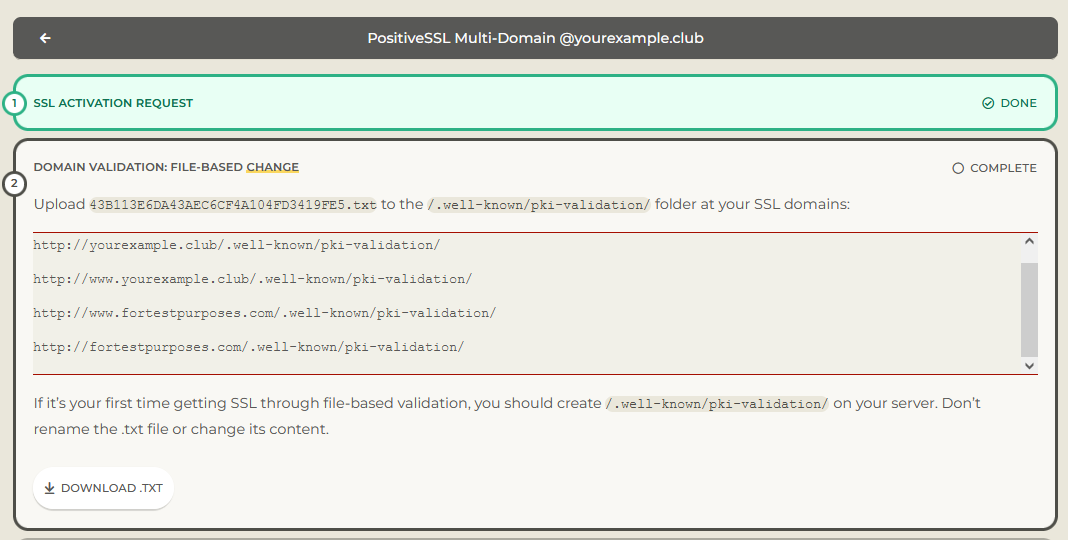
Important: Do not alter the content of the file or rename it.
Where to upload the file?
Place the validation file into this location: <DOCUMENT_ROOT>/.well-known/pki-validation/
<DOCUMENT_ROOT> stands for your website name.
Full real-life URL will look like this:
http://your_site.com/.well-known/pki-validation/validation_file.txt
Where your_site.com – your actual website address and validation_file.txt – the name of the .txt file you’ve downloaded from the SSL details page in your account.
The validation path is not available by default if it’s your first time using HTTP validation, so you need to create both “.well-known” and “pki-validation” folders inside your document root.
Tip: On Windows-based servers, add another dot at the end of the folder name (‘.well-known.’). Otherwise, the server won’t allow you to save it with the name that has a dot at the beginning.
Single-domain SSLs
For Single-domain SSLs, you need to make the validation file available both via http://your_site.com/.well-known/pki-validation/validation_file.txt and http://www.your_site.com/.well-known/pki-validation/validation_file.txt
This also applies to SSLs activated for subdomains. You will need to make the file accessible both via http://subdomain.your_site.com/.well-known/pki-validation/validation_file.txt and http://www.subdomain.your_site.com/.well-known/pki-validation/validation_file.txt
If the SSL was activated for your_site.com and the file is accessible via your_site.com and not accessible via www.your_site.com, then the SSL will be issued only for your_site.com. Vice versa, if the SSL was activated for www.your_site.com and the file is not available via your_site.com, then the SSL will secure only www.your_site.com. If you wish to add the missing hostname, you should reissue your SSL making the file available both via www.your_site.com and your_site.com.
If the www subdomain is not pointed to the same server as the main domain or subdomain, you should either point it there using A or CNAME host record. Alternatively, if the www subdomain points to a different server on purpose, then the validation file should be uploaded both to the server of the main domain and the server of the www subdomain.
Multi-domain SSLs
For Multi-domain SSLs, the validation file needs to be uploaded and accessible for each hostname you specified during the certificate activation.
For example, if you activated a Multi-domain SSL for your_site.com, www.your_site.com, and site_b.net then you should make the file accessible at the following links:
http://your_site.com/.well-known/pki-validation/validation_file.txt
http://www.your_site.com/.well-known/pki-validation/validation_file.txt
http://site_b.com/.well-known/pki-validation/validation_file.txt
How do I check that the file is publicly accessible?
On the “Details” page of the pending certificate, click the links in the “Verify File Upload” panel.

If the files are uploaded correctly, each of the URLs will open with the correct .TXT file content displayed on the screen.
Please note that the links on the screenshot above are only examples. Every SSL certificate receives a validation file with a unique name and content. You’ll be able to download yours in your account as described above.
Next, you can use the “Confirm File Upload” button to get the SSL status updated accordingly. It may take a couple of minutes after the files are available via the given links.
Switch the validation method to HTTPS in “Status checker“, if you don’t see your file via HTTP link but you can see it via HTTPS link: https://your_site.com/.well-known/pki-validation/validation_file.txt
DNS
DNS validation requires you to create a CNAME record in the DNS settings of your domain.
This method is not available for Multi-Domain SSLs at the stage of activation. Though, after completing the activation, you can change your DCV method by using the Sectigo Order Status Checker tool.
The Certificate Authority starts checking the CNAME record after you activate your SSL. Once they manage to locate the record, the DCV will be completed. If you have a Domain Validation certificate, the SSL will be issued and sent to your email address right away. In the case of an Organization or Extended Validation SSL, the CA will also need to perform business validation.
Note: If you are using DNSSEC for the domain, ensure it is configured correctly or maintain it (including key rollovers). If it is misconfigured, certificate issuance will be paused until the DNSSEC issues are resolved.
How can I get the details for the CNAME record?
Once you complete the activation process, you will end up on the SSL ‘Details’ page that will display the necessary CNAME details:
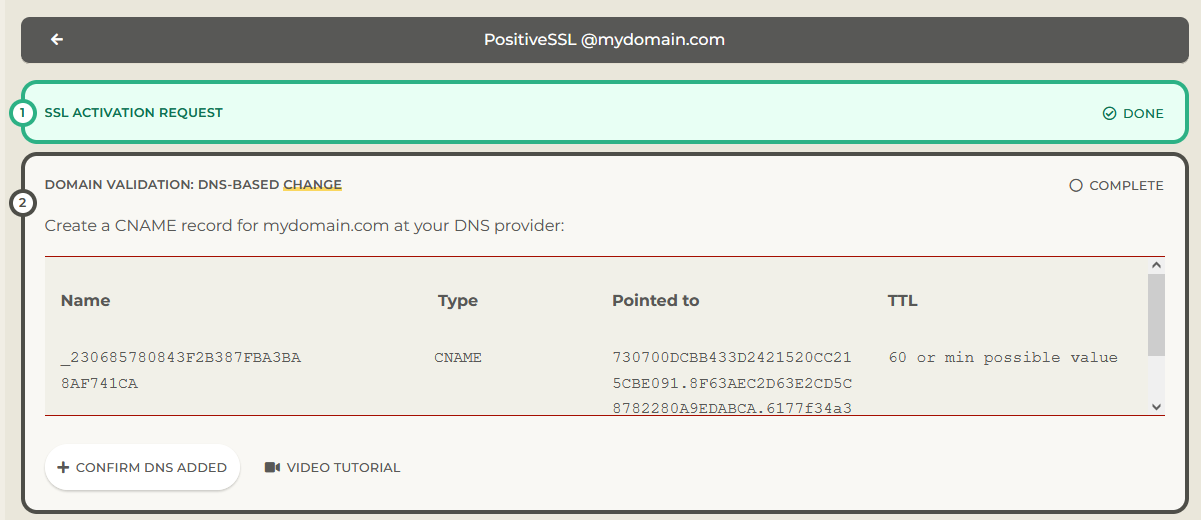
Please note that the picture above displays an example record. Every SSL order receives unique validation record values. You can find the record for your SSL order in your SSLs.com account.
How to set up the CNAME record?
Go to the DNS settings of your domain name. They are usually managed by your domain registrar or hosting provider.
Set up the CNAME record using the CNAME details from the certificate details page.
Depending on the DNS provider, ‘Host’ may also be called ‘Name’ and Target may be called ‘Value‘. Regardless of the name, the ‘Host’ value always goes first.
We suggest setting up the minimal available TTL (Time to live) for the record to avoid long delays if the record is created incorrectly with the first attempt.
How to check that the CNAME record is accessible?
Verify that the record has been set up properly at https://toolbox.googleapps.com/apps/dig/#CNAME/.
Enter the full CNAME hostname including the domain name (i.e. _c7fbc2039e400c8ef74129ec7db1842c.your_site.com).
Click on ‘CNAME’.
You should see a set of characters you used as the ‘Target’ value for CNAME (i.e. BDAA7CB9FF2613D28282F699615242B0.59ED3C5E1F557FFB5DFB507A364CCD0D.comodoca.com)
Switch to DNS TXT Random value method
Since January 2025, a new “DNS TXT Random value” method is available for any order via Sectigo Order Checker. More details on how to use this DCV method can be found here.
What should I do after setting up the file or CNAME record?
You can trigger a DCV check by using the ‘Change and Resend/Retry’ option in the ‘Status Checker‘ once the record is in place.
We suggest waiting for up to 10 minutes for your SSL status to be updated in your SSLs.com account. You can use the ‘Confirm DNS Added’ button to update the SSL status.
Once issued, your SSL will be sent to the admin email address you specified during the activation process. You’ll also be able to download it in your SSLs.com account.
If you experience any issues or need help, feel free to contact us via Live Chat or by email us at support@ssls.com.